Fenix Gun Light & Tactical with Laser GL23R Multi-Purpose Tactical Max 1,200 Lumens, Max 240m Beam Distance, Powered by 1 x 18350 1,100mAh Li-ion Battery Included, Build-in USB Type-C Charging Port, Precise Green Laser Sight.. 5 Years Free
- Brand: Fenix
- MPN: FNX-GL23R
- Part #: TOLFNX0147
- UPC:


- Brand: Fenix
- MPN: FNX-GL23R
- Part #: TOLFNX0147
- UPC:
Features
Fenix GL23R Weapon Light Video
SPECIAL ORDER ONLY!
Important Warnings
FAILURE TO READ AND FOLLOW THESE OPERATING INSTRUCTIONS AND WARNINGS WHEN HANDLING A FIREARM OR THE GL22R CAN BE DANGEROUS AND CAN RESULT IN SERIOUS INJURY, DAMAGE TO PROPERTY, OR DEATH.
Before attaching, inspecting or servicing a firearm-mounted GL23R
- Engage the safety of the firearm if applicable.
- Remove the magazine from the firearm if applicable.
- Open the action and inspect the chamber to be sure it is empty.
Warning
- The LED light with green laser is a high-intensity lighting device capable of causing eye damage to the user or others. Avoid shining the light directly into anyone's eyes.
- This light will accumulate a significant amount of heat while operating, resulting in a high temperature of the light shell. Pay close attention to avoid burns.
- Do not shine an object at close range, to avoid burning the object or causing danger due to high temperature.
Warranty: 5-Years Free Repair Warranty (Battery for 1 year)!
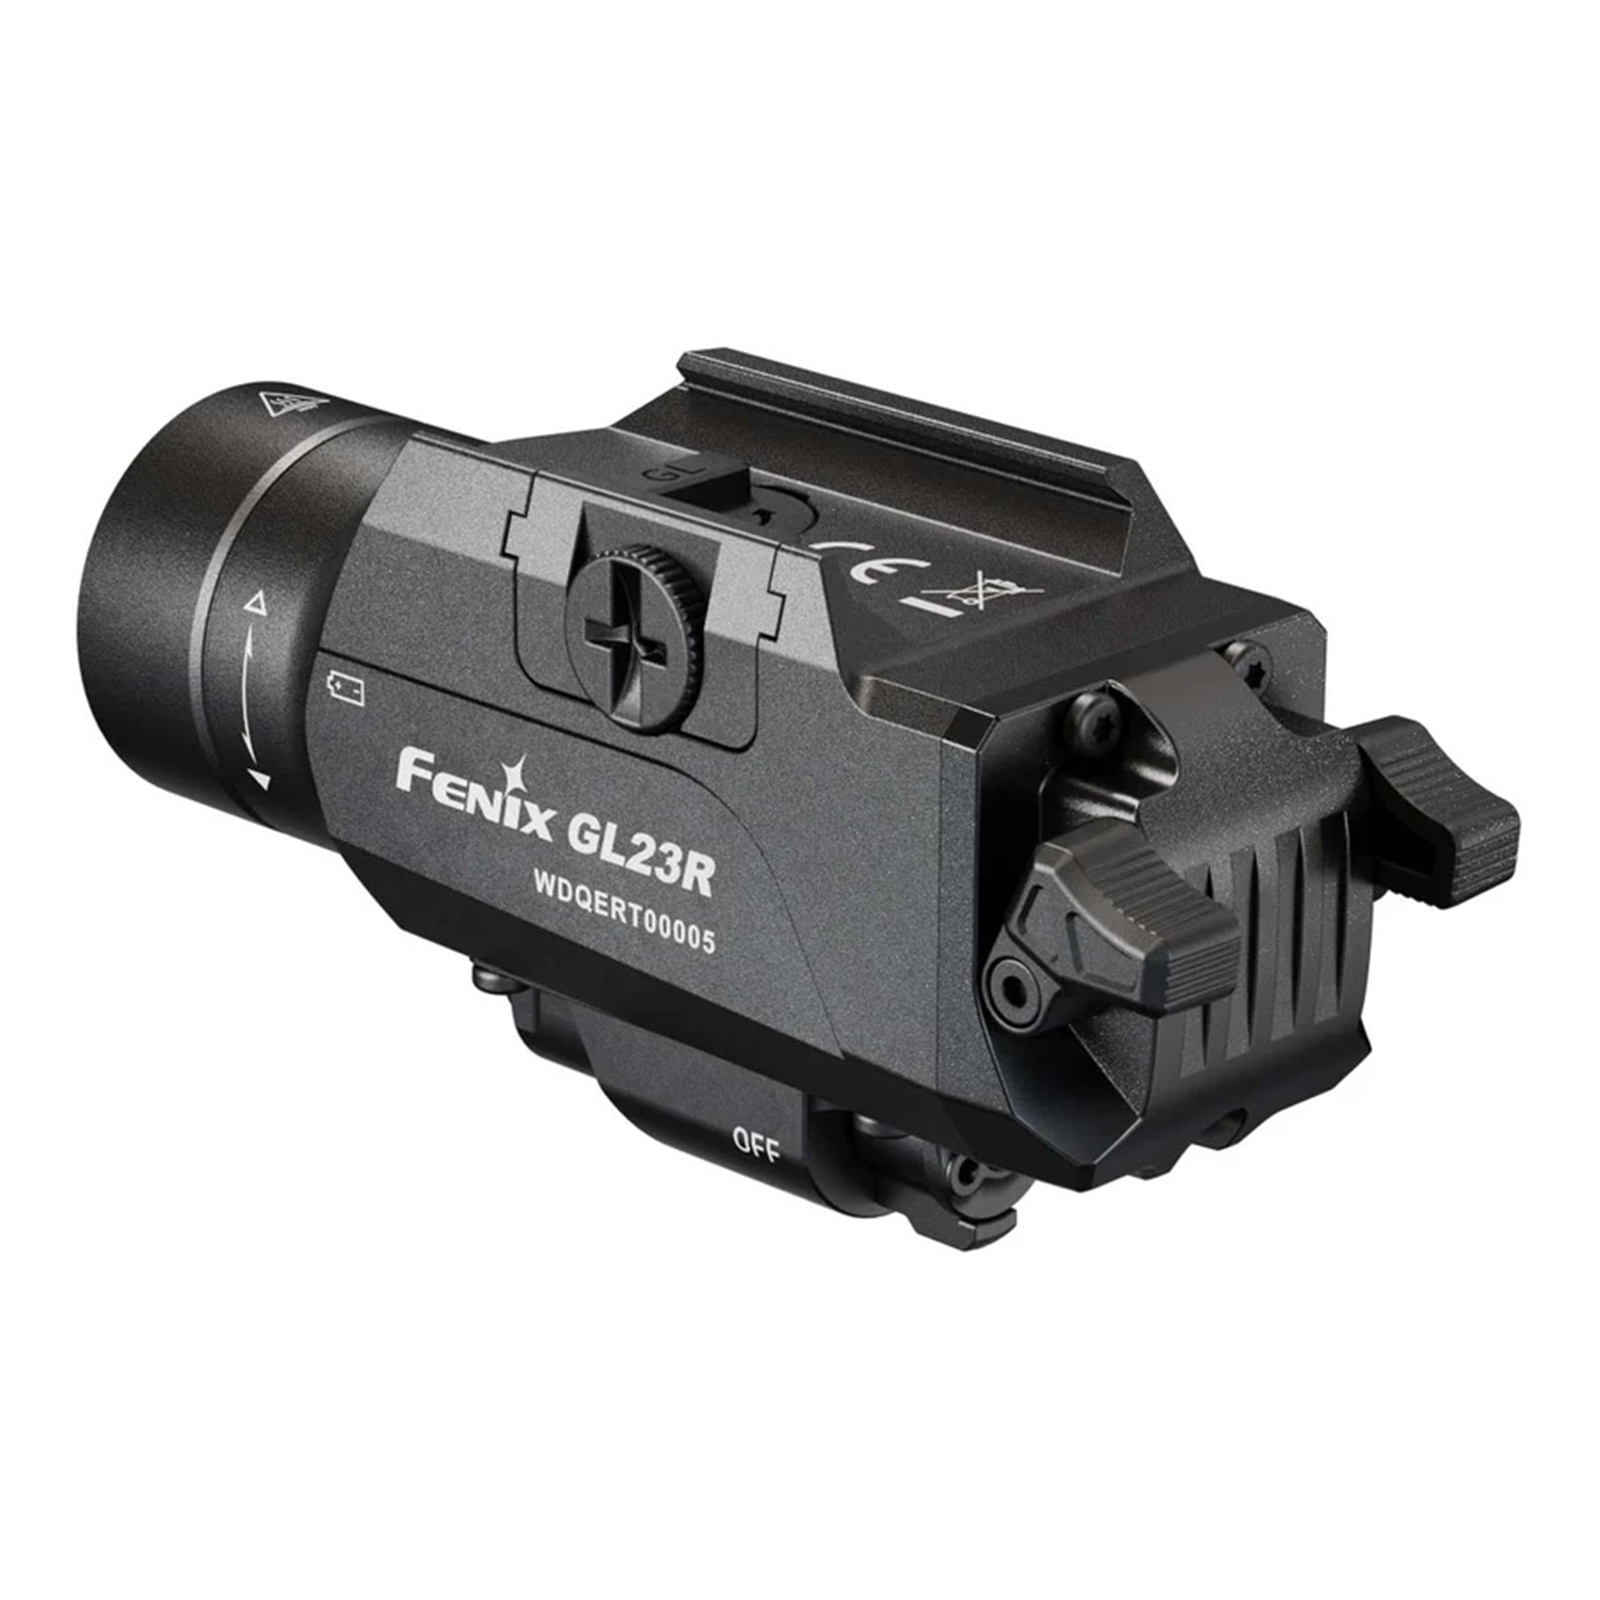
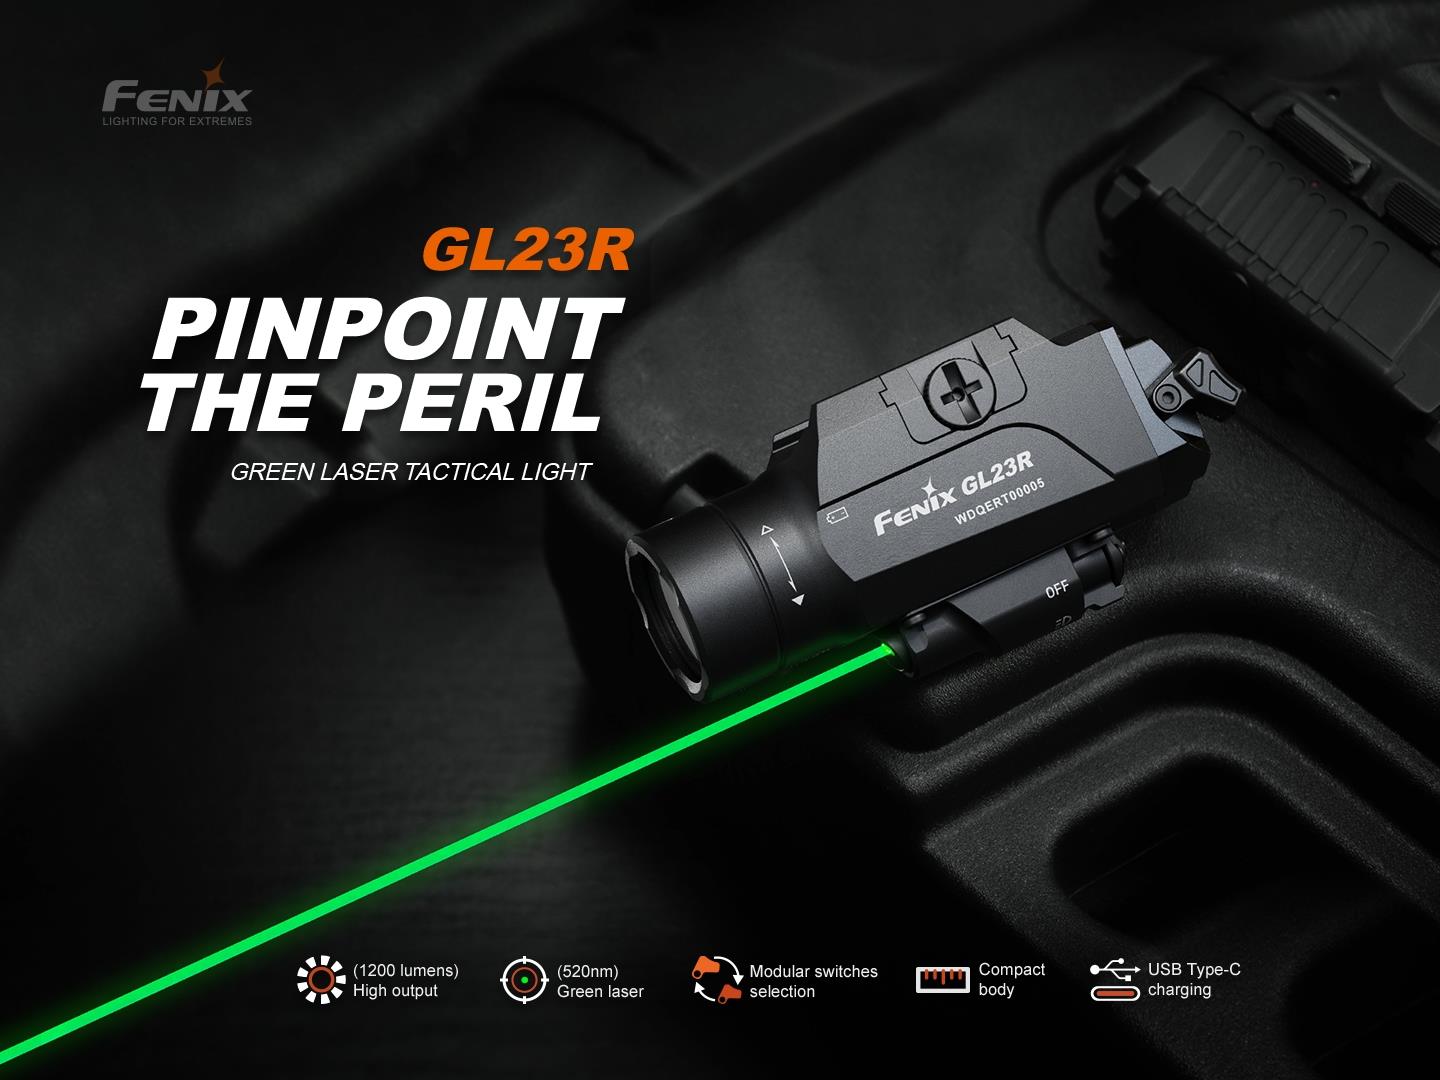
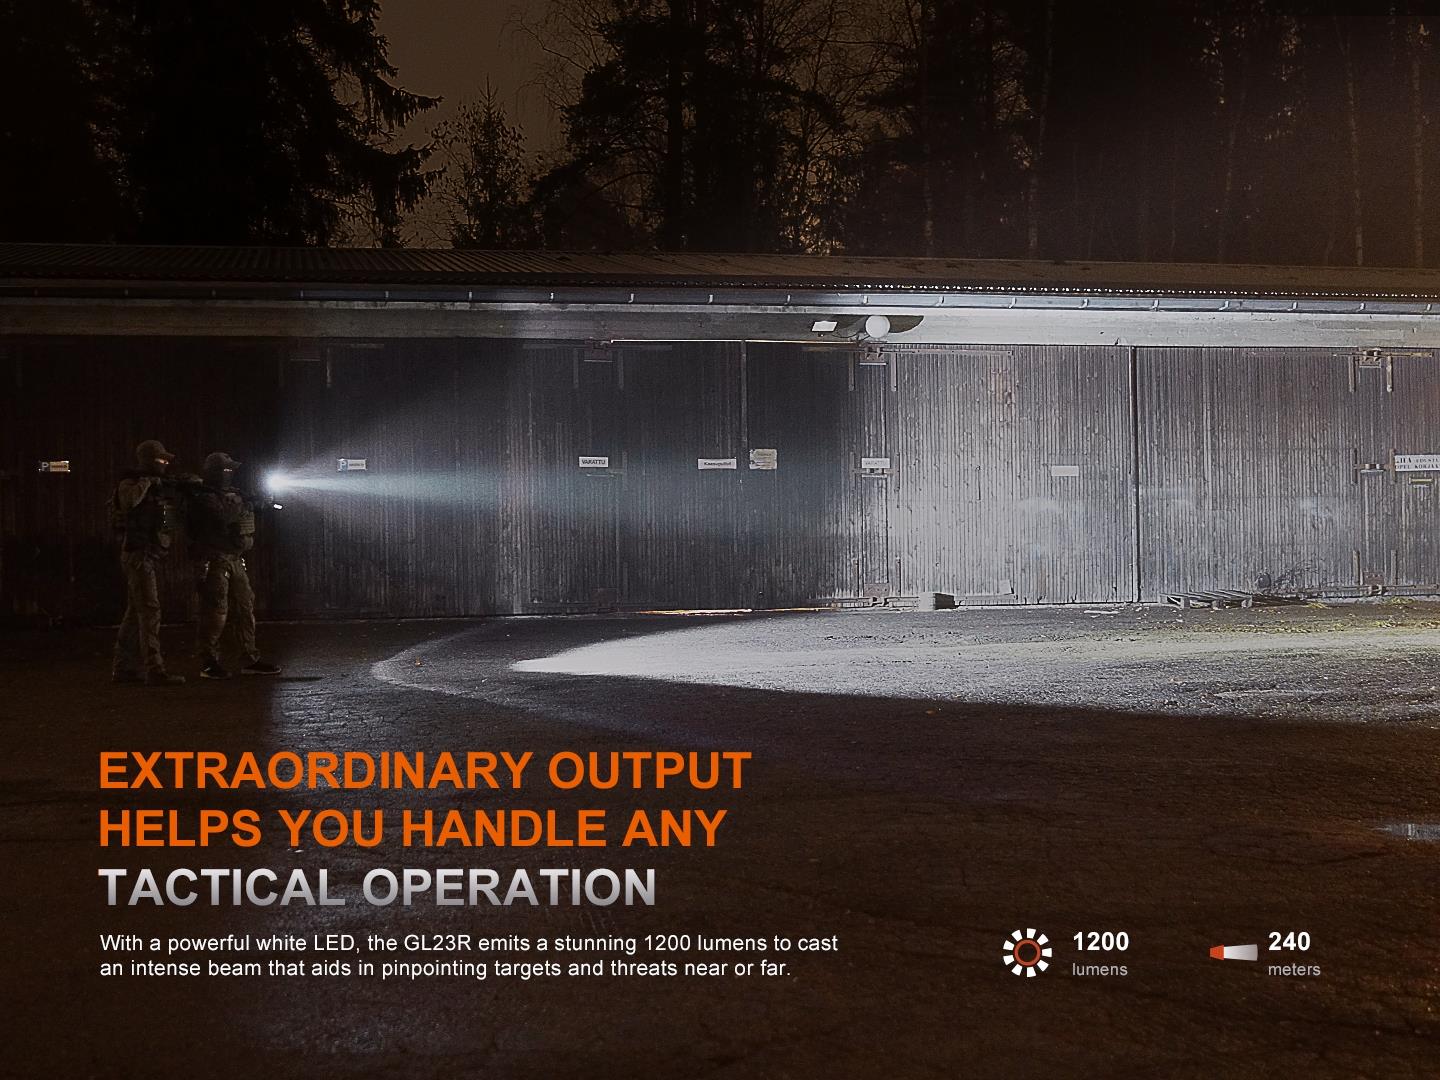
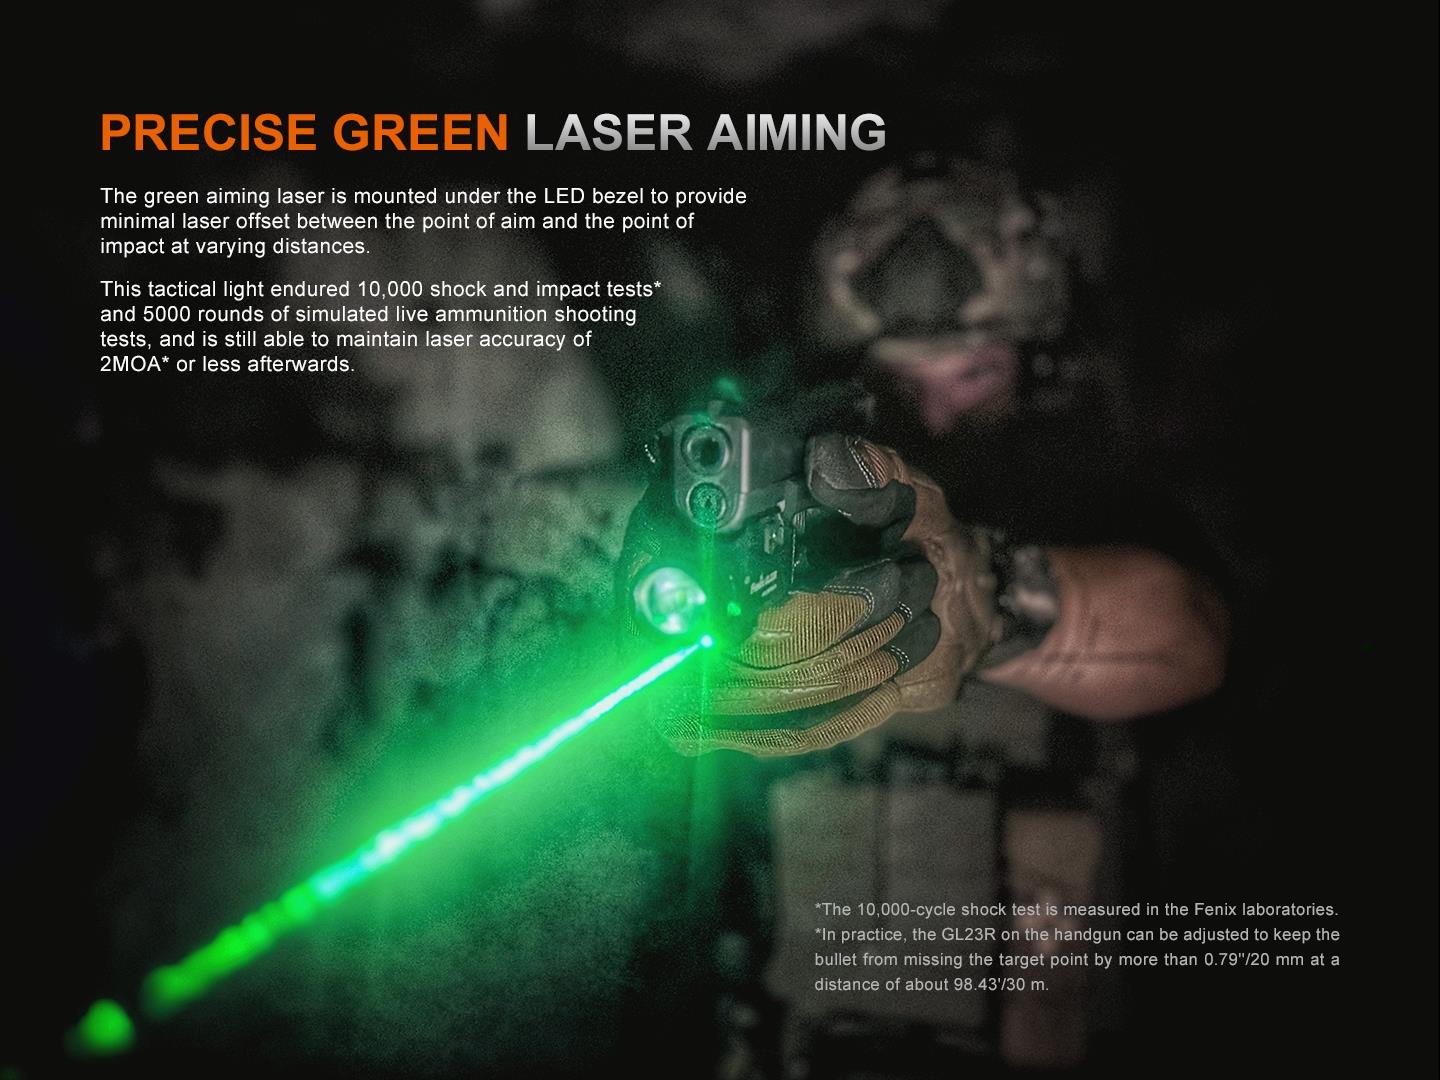
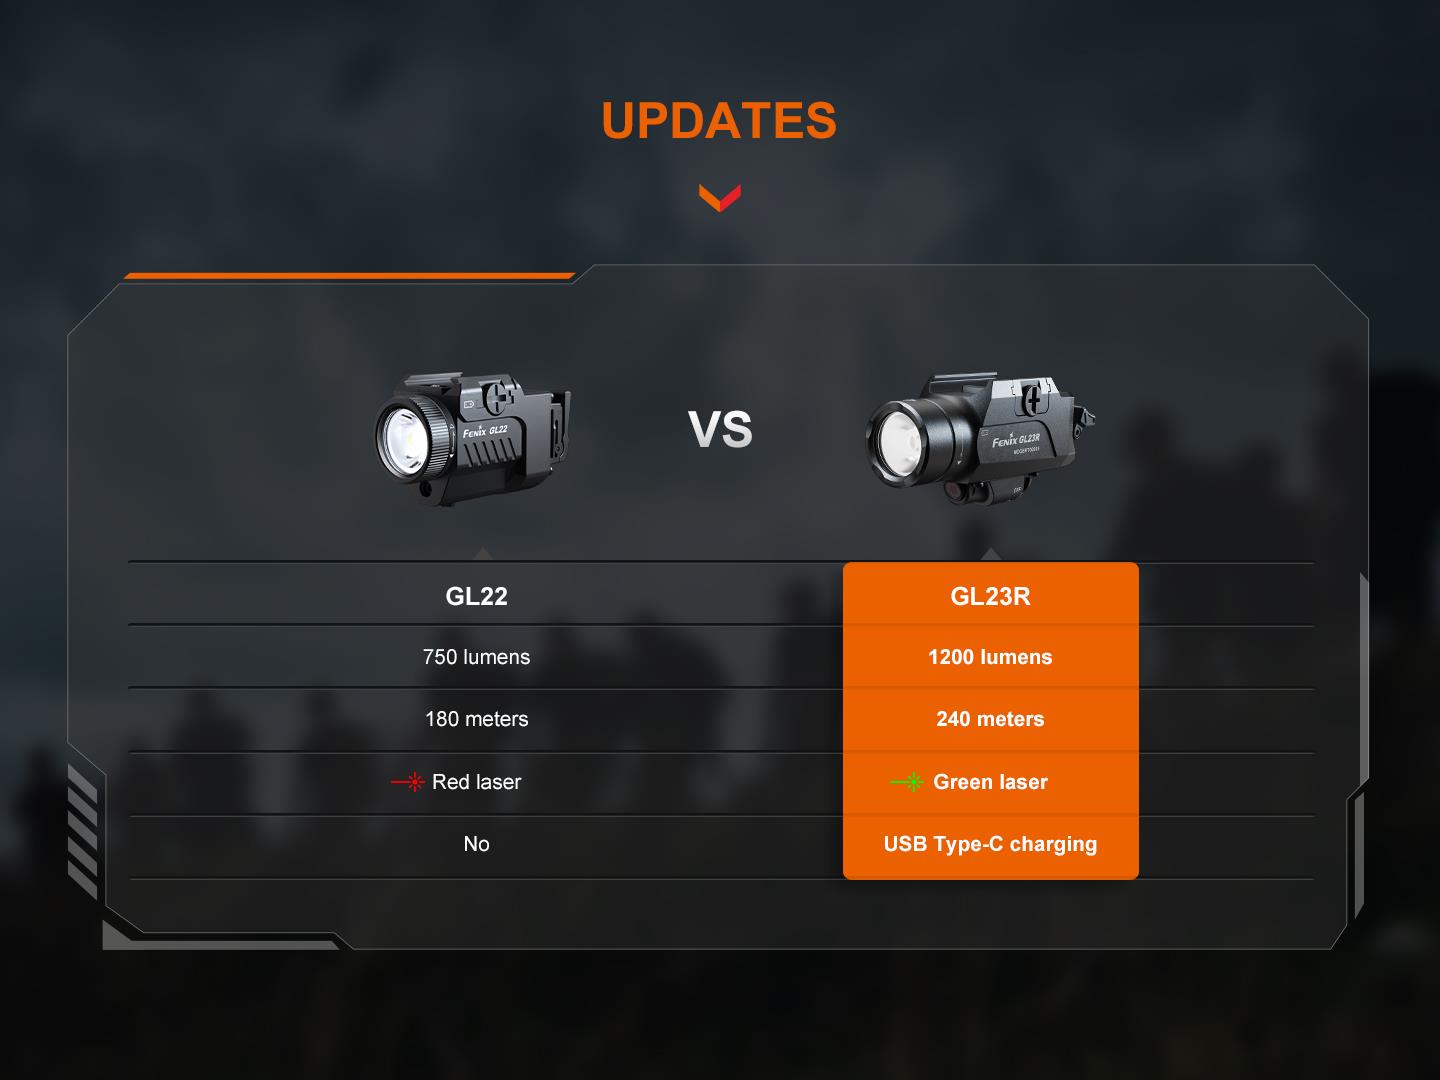
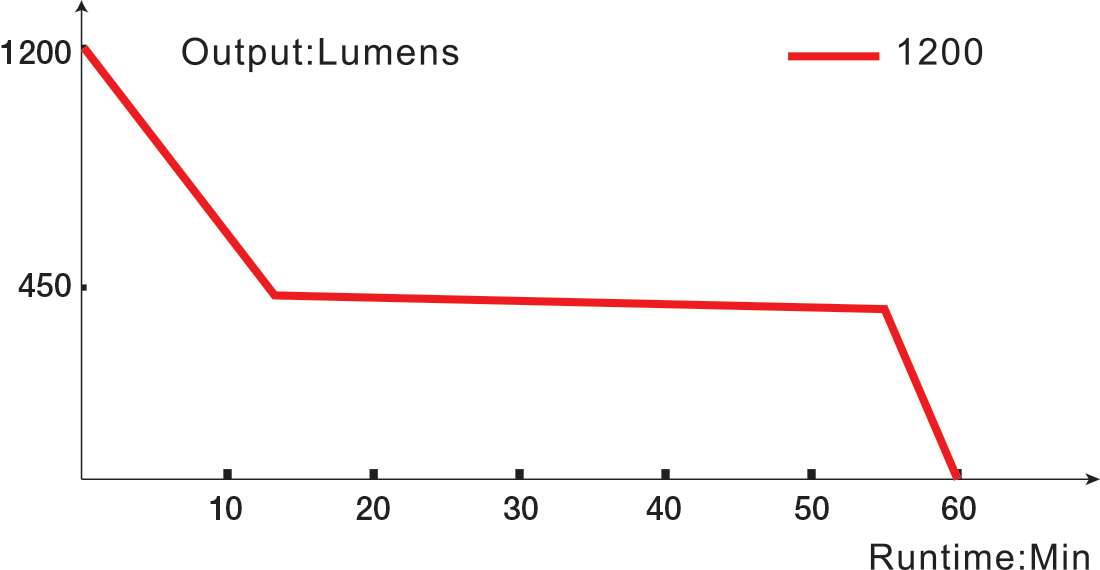
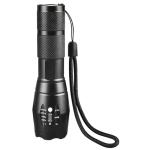
The Fenix GL23R is engineered to fit virtually any rail-equipped pistol. Its recoil-proof LED and TIR lens focus 1,200 lumens of light into a smooth, far-reaching hybrid beam with a large central spot and plenty of spill light, an extremely effective combination for close- to medium-range engagements. Available in high-vis green (520 nanometers), its 5-milliwatt laser is highly visible to the human eye to help the user get on target quickly and accurately. With a Mil-Spec hard-anodized aluminum body that's light, strong and weatherproof, it can handle hard knocks and stay in the fight. Powered by a single high capacity 18350 rechargeable li-ion battery, the GL23R delivers efficient run times in both white light and laser. Intuitive, ambidextrous switching provides instant one-finger control of momentary-on or constant-on activation to help you control the situation. It's a game changer in low-light conflict.
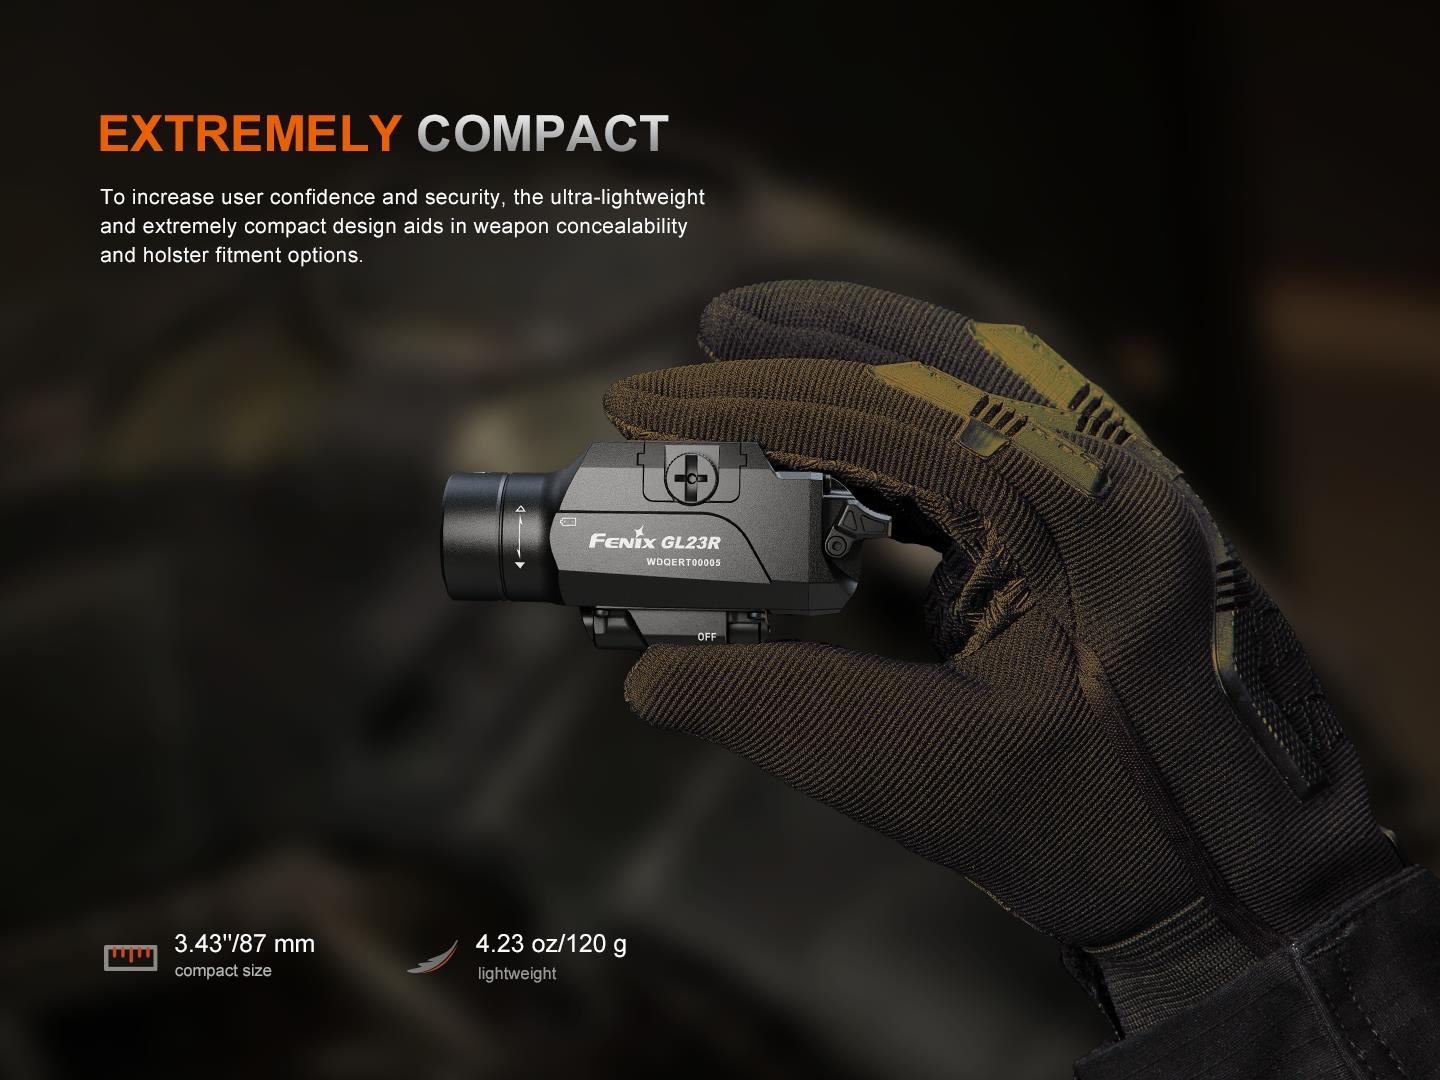
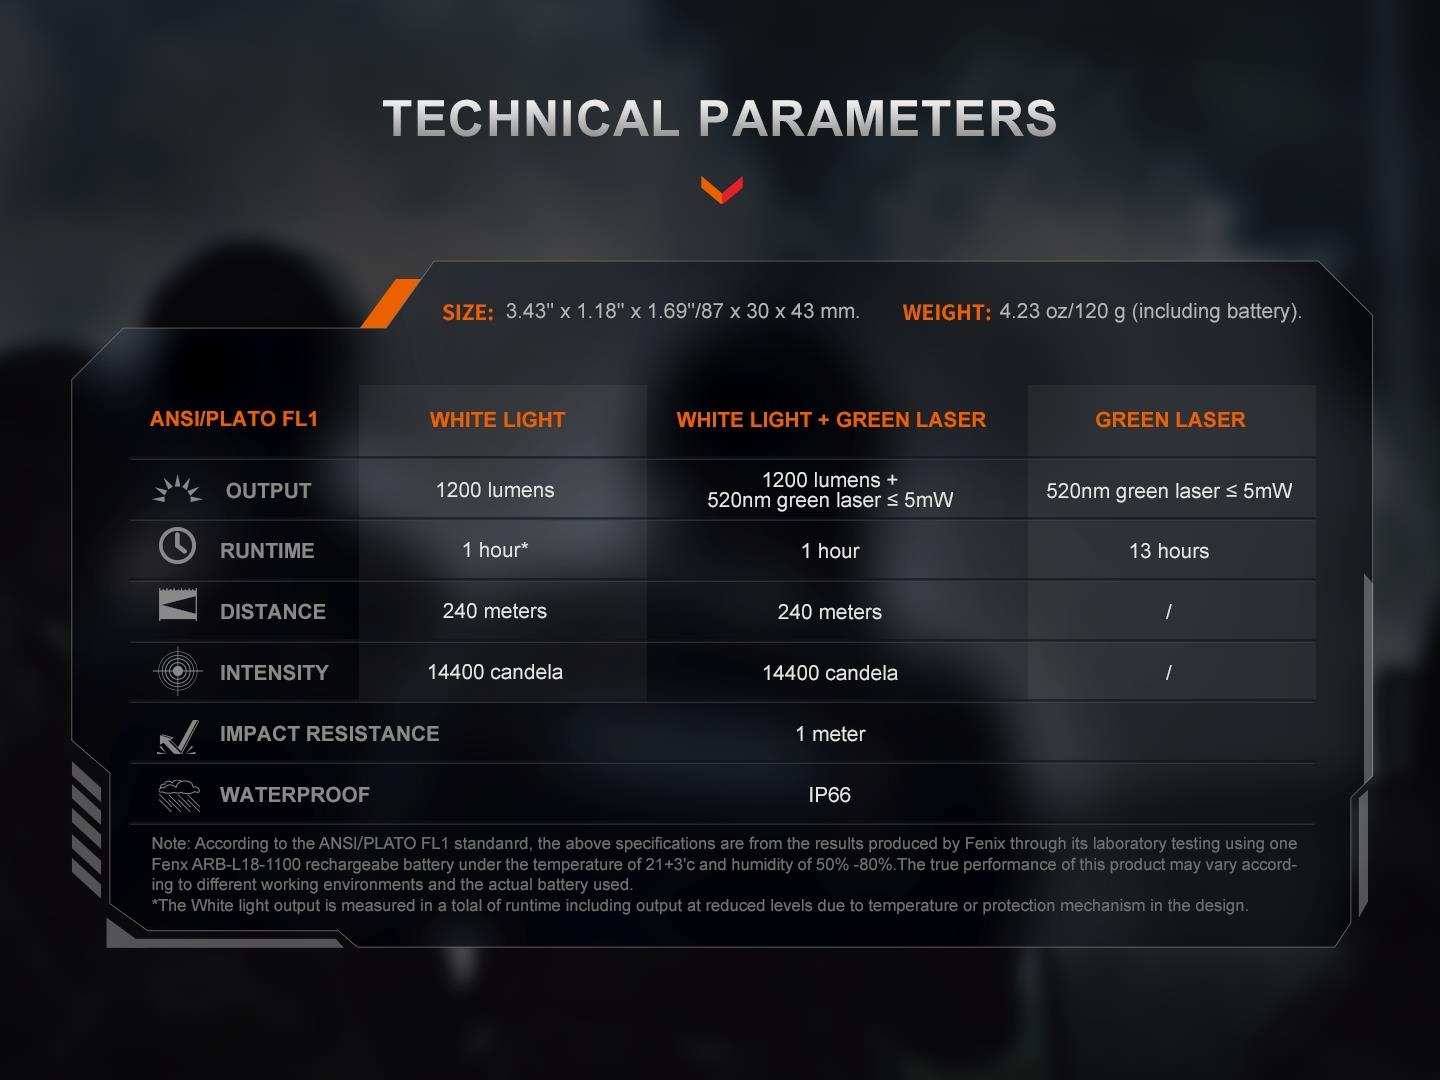
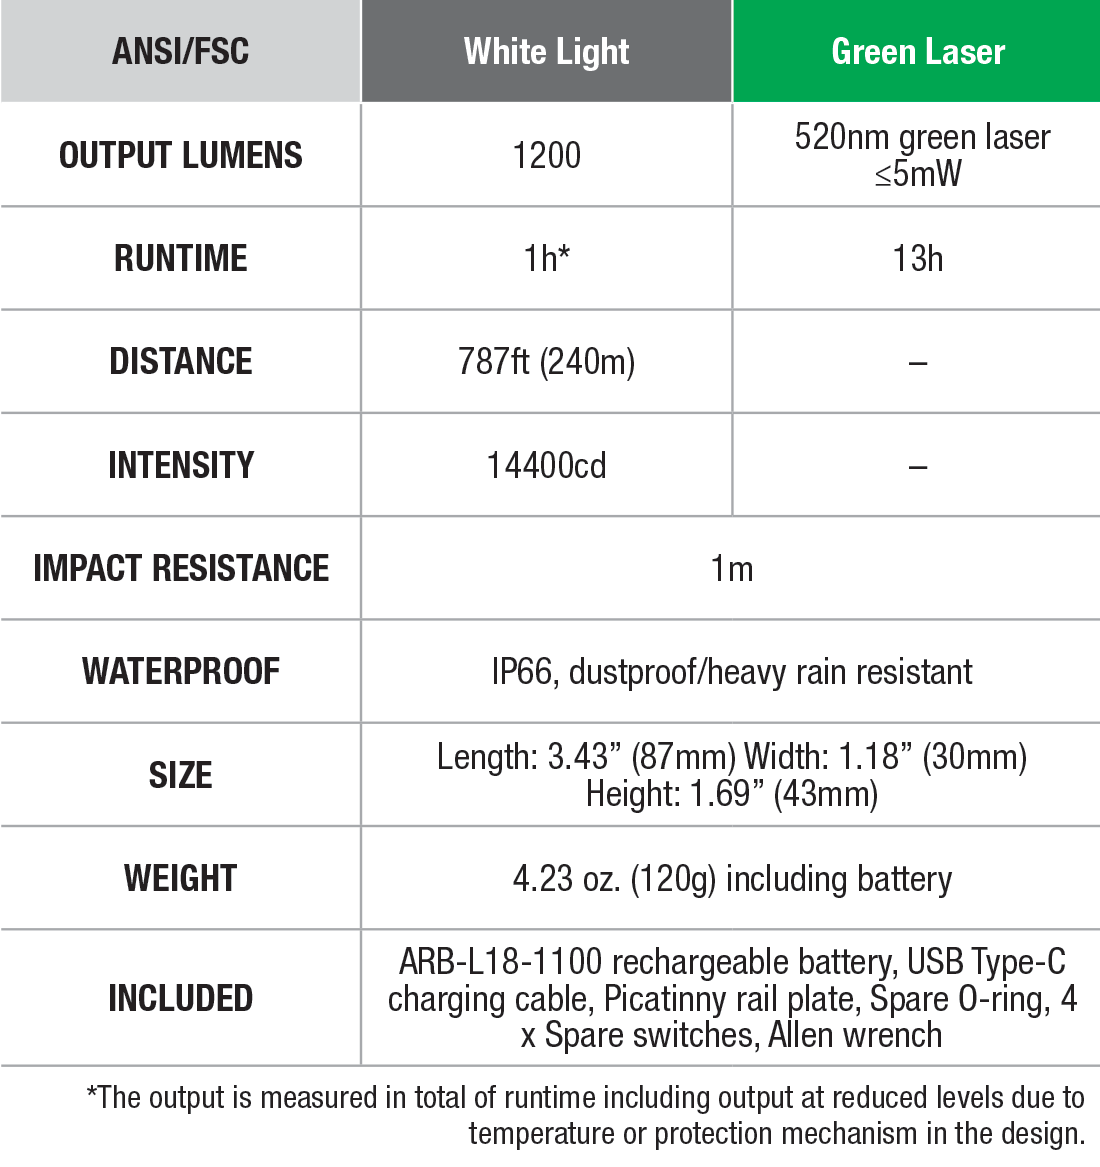
Size: 3.43'' x 1.18'' x 1.69''/87 x 30 x 43 mm
Weight: 4.23 oz/120 g (including battery)
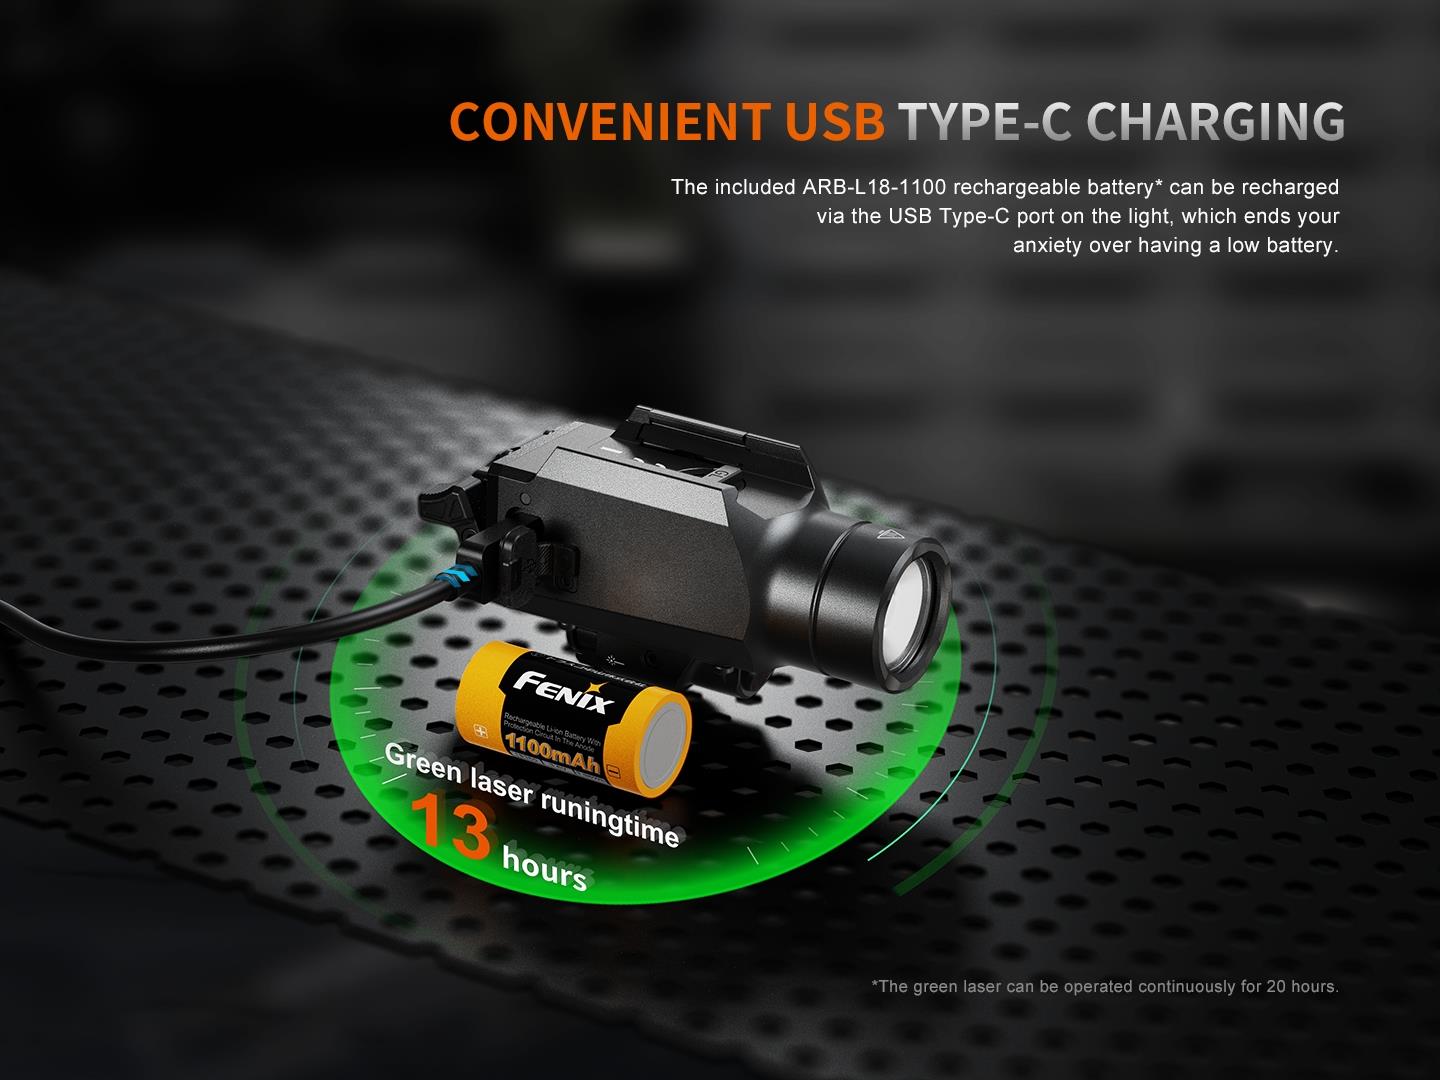
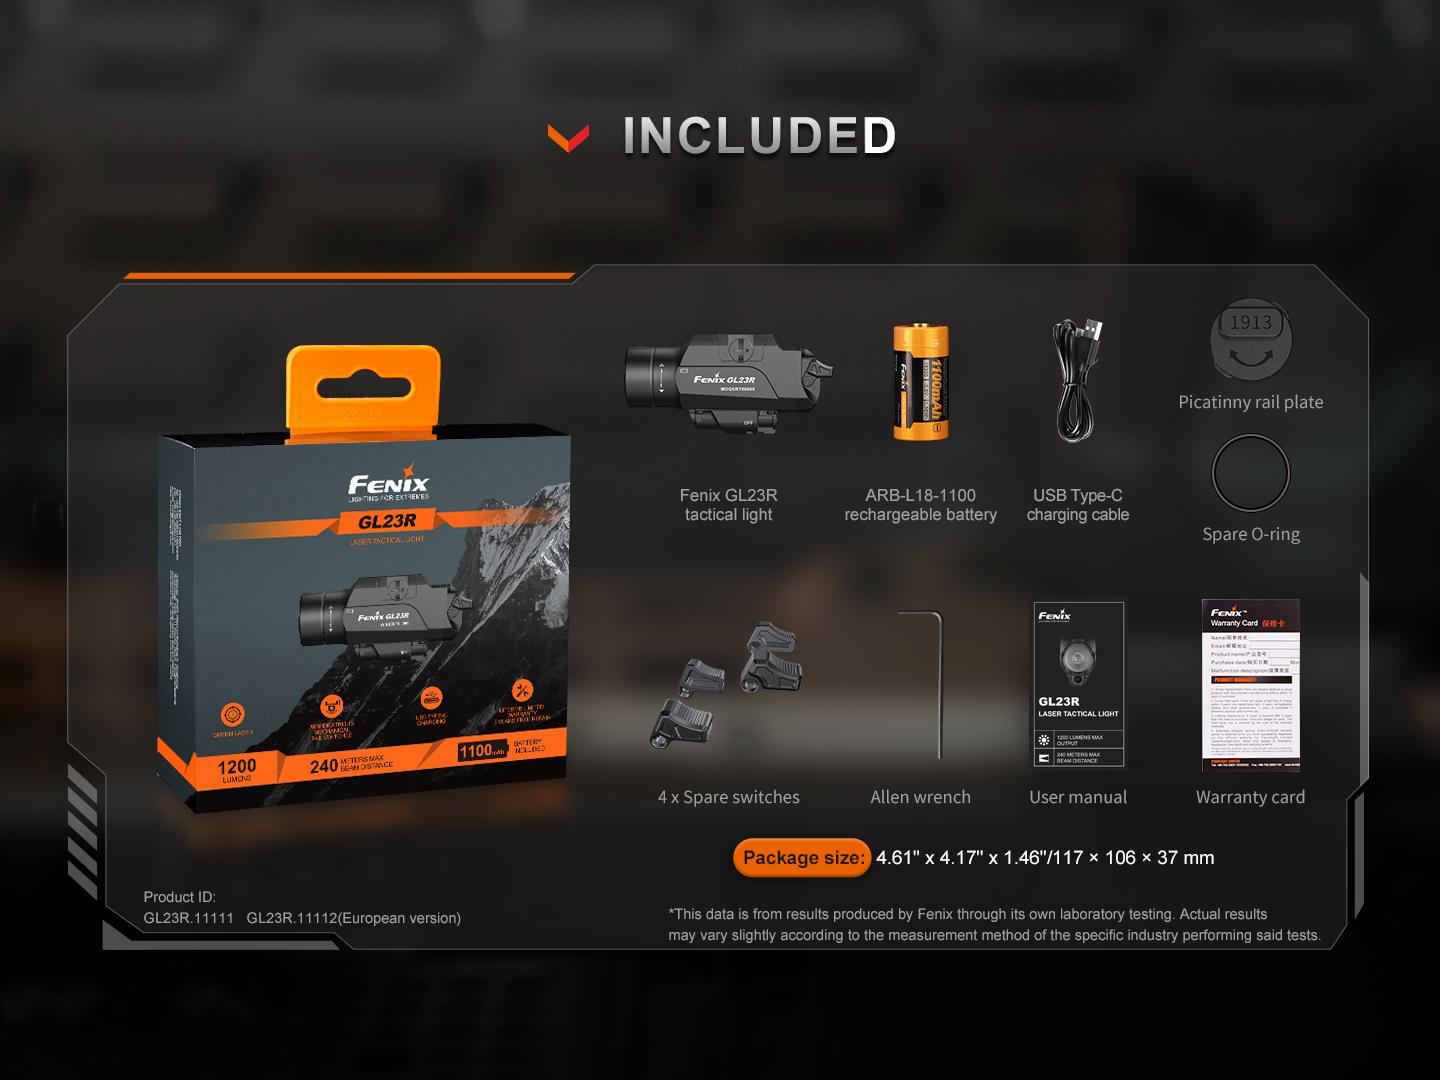
Battery: Included a Fenix ARB-L18-1100 rechargeable battery
PRODUCT FEATURES:
- 1200 lumens maximum output, 240 meters maximum beam distance.
- Uses a Luminus SFT40 LED with a lifespan of 50,000 hours.
- Digitally regulated circuit for maintaining a stable output.
- Reverse polarity protection, to protect from improper battery insertion.
- Design for guns with tactical rails.
- Ambidextrous switching with dual tactical tail switch.
- Dual tail switch can be replaced according to user's preferences.
- Precise green laser sight.
- Made of durable A6061-T6 aluminum alloy material.
- Premium type HAIII hard-anodized anti-abrasive finish.
- Toughened ultra-clear glass lens with an anti-reflective coating.


Operating Instruction:
Mounting
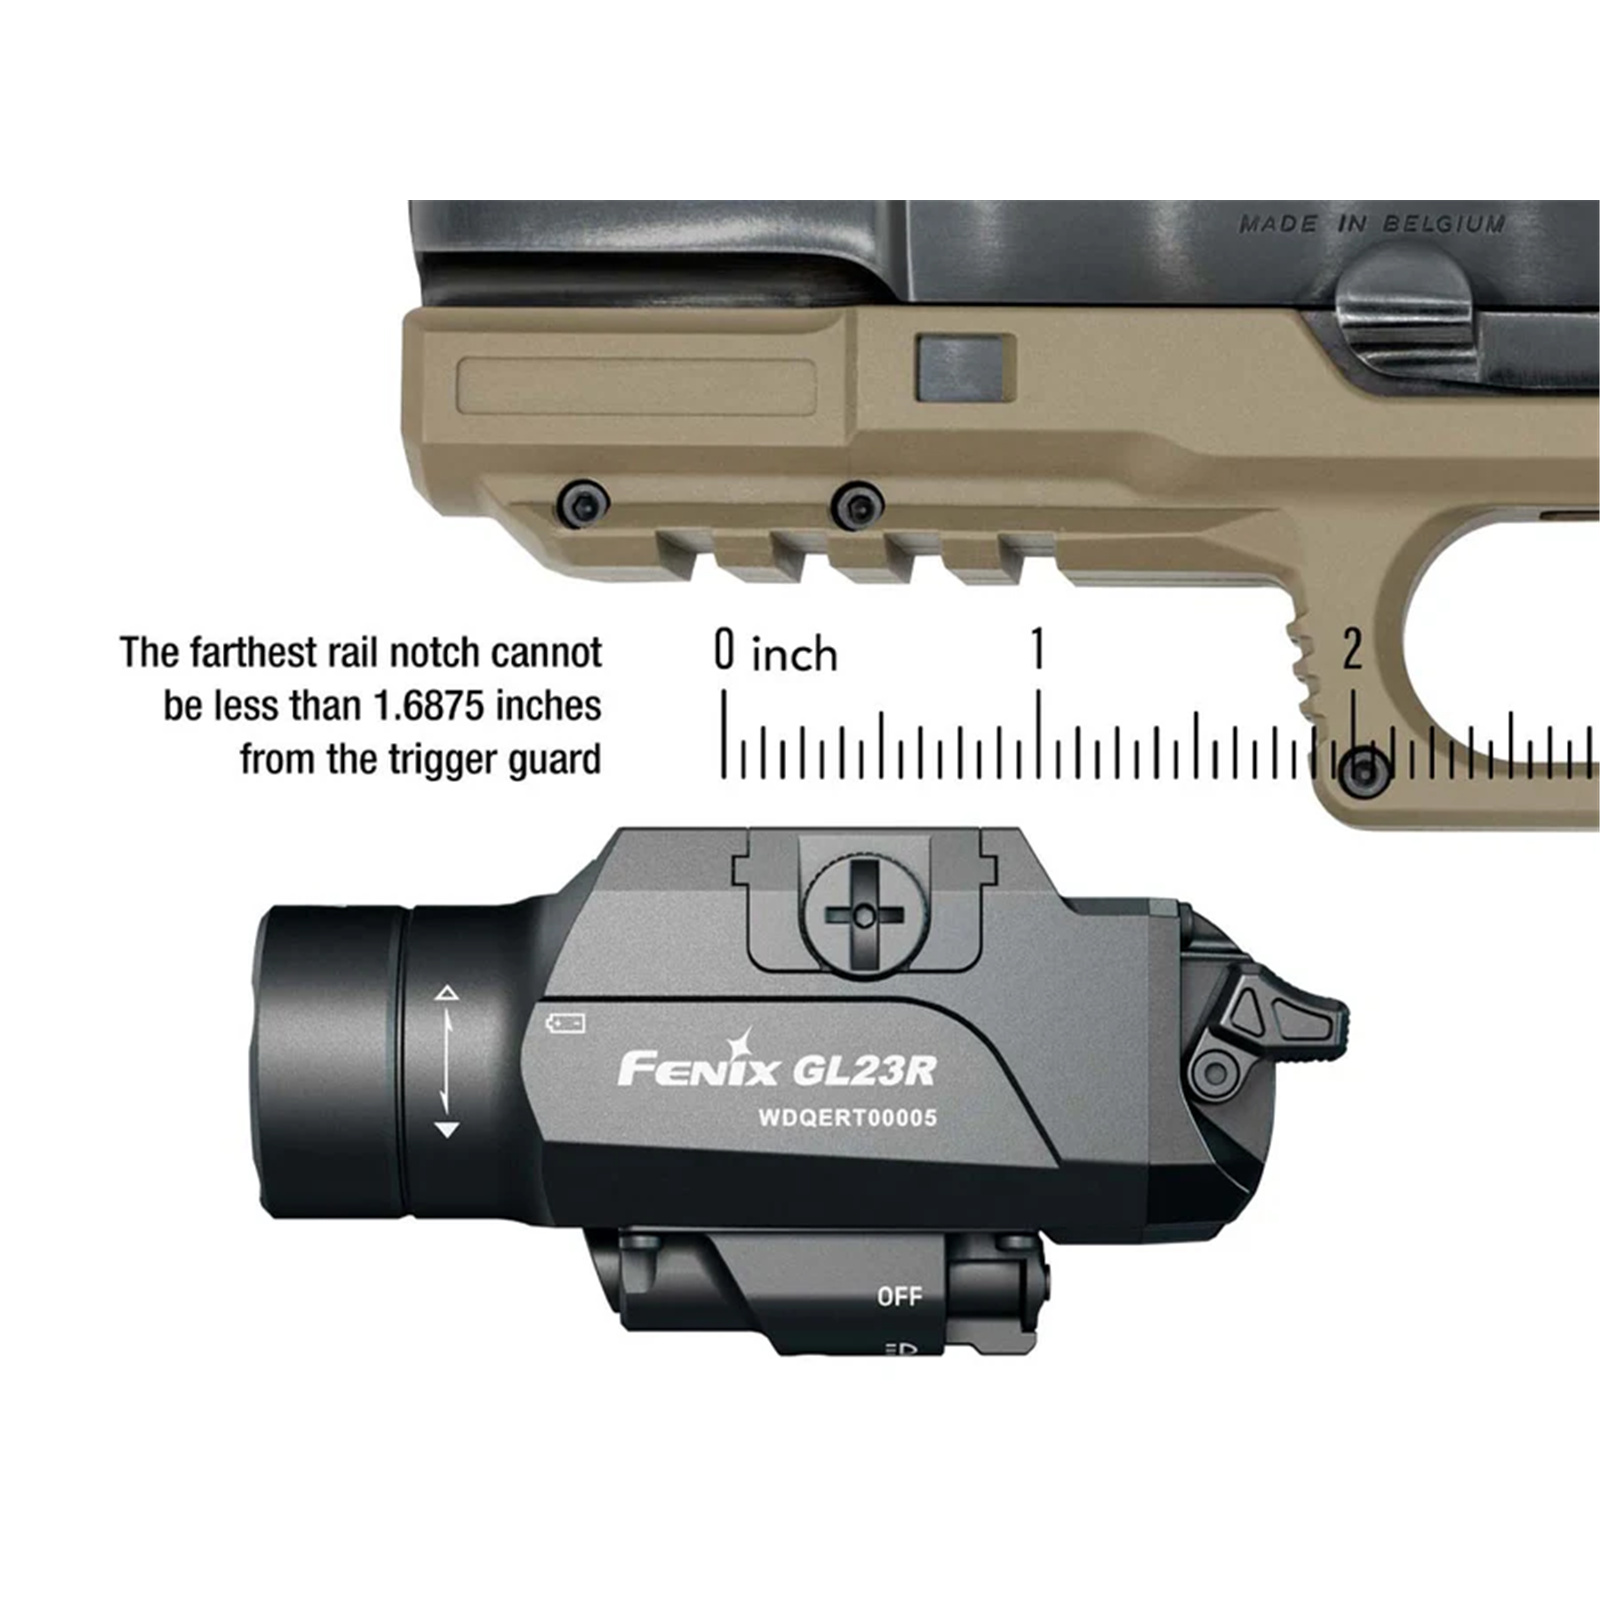
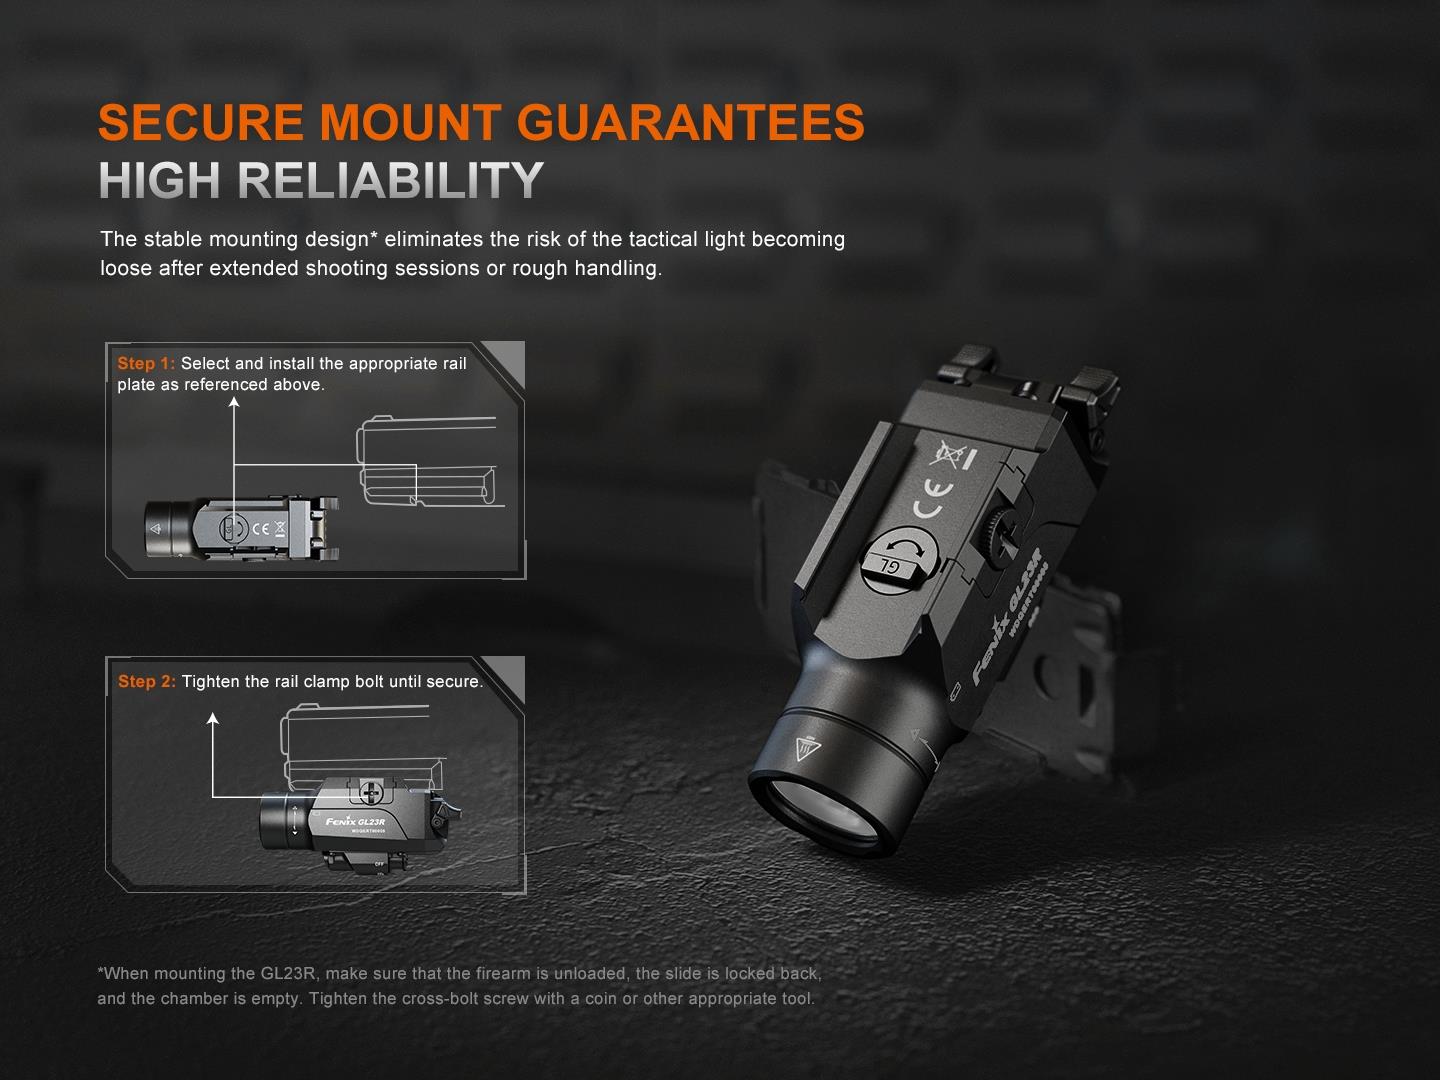
Please make sure your firearm rail is Picatinny rail or Glock rail and choose the appropriate rail plate (Glock rail plate is installed by default), you can change the rail plate to make the tactical light more suitable for your firearm.
1, The GL23R is designed for precise aiming, it required a basic tool or simply a coin to be attached or detached from the side of the weapon or accessory rail.
2, Loosen the rail clamp bolt.
3, Placing the fixed portion of the rail clamp against the accessory rail and align the rail key with the appropriate cross groove in the accessory rail.
4, Tighten the rail clamp bolt and make sure it is securely attached to the firearm. Again a coin should be helpful to obtain sufficient tightness.
Operating Instructions
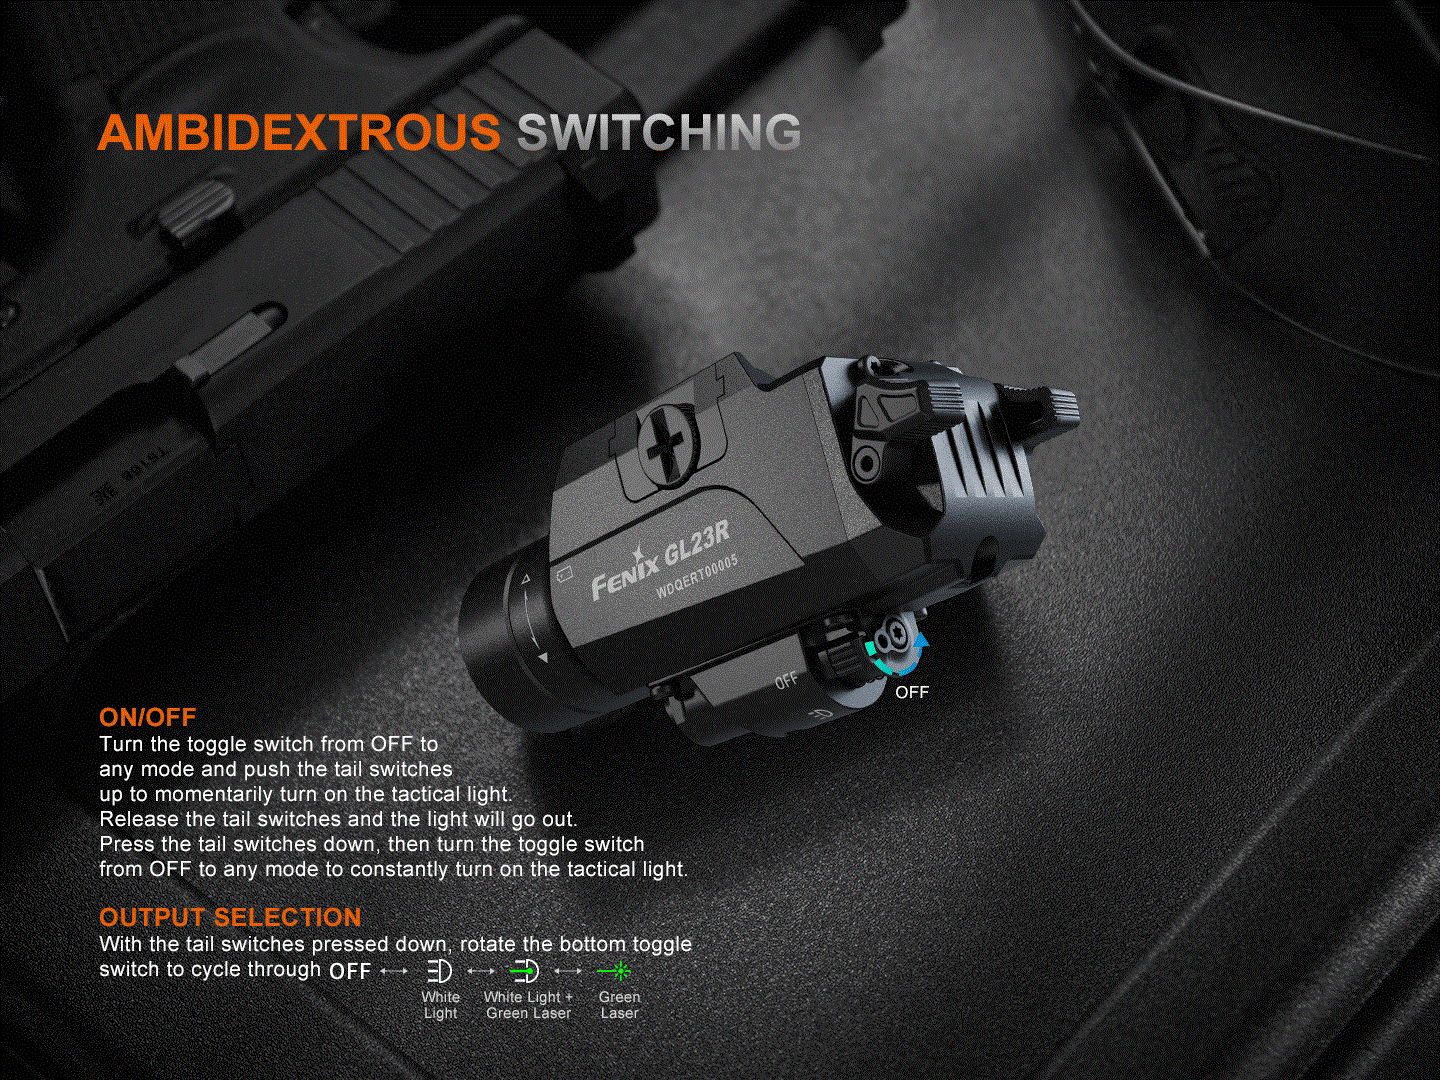
The tail switches can be operated with both hands. Rotate the toggle switch at the bottom to select the designated mode.
On/off
Rotate the bottom toggle switch from OFF to any mode and push the tail switches up or down to turn on the tactical light. Reset the tail switches to turn off the tactical light.
Output Selection
With the tail switches pressed down, rotate the bottom toggle switch to cycle through OFF?White Light?White Light + Green Laser?Green Laser.
Laser Sight Zeroing
The windage adjustment is at the left sign of the light. Use the included Allen wrench clockwise or counter-clockwise to move the laser point.
The elevation adjustment is located at the bottom of the light, use the included Allen wrench clockwise or counter-clockwise to move the laser point.
When making large adjustments they may be an interaction that causes the laser to move diagonally or bind. It may become necessary to rotate the opposing adjustment screw counterclockwise to allow the laser cartridge to move to the desired position.
*Laser parameters: CLASS 3R laser product, laser wavelength 510 - 530nm, laser optical power output =5mW.
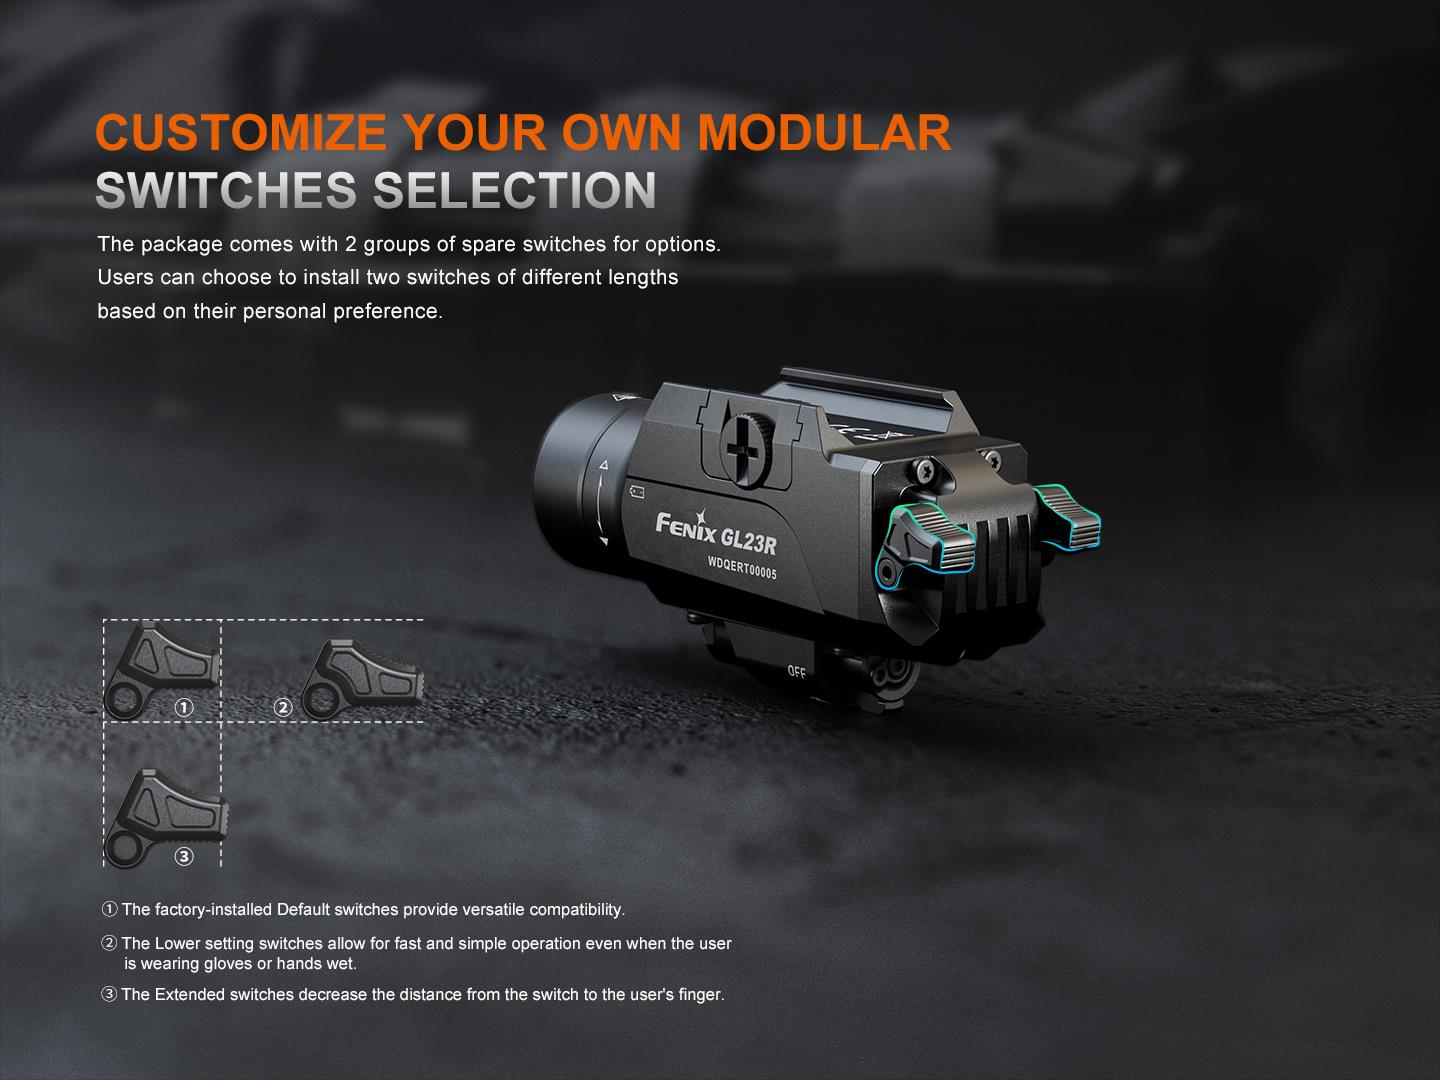
Tail Switches Replacement
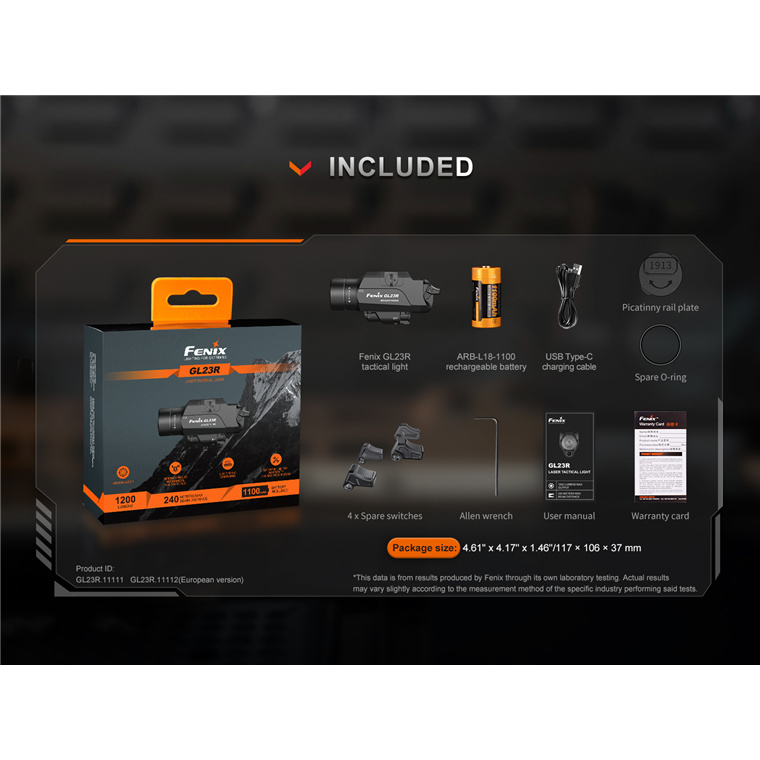
Three groups of spare switches are included:
- Use the included Allen wrench to remove the T4 screw on the tail switch, then replace the tail switch and screw the T4 screw back on.
- Users can choose to install two switches of different lengths based on their usage habits.
Battery Specifications

Warning:
*18350 Li-ion batteries are powerful cells designed for commercial applications and must be treated with caution and handled with care. Only using quality batteries with circuit protection will reduce the potential for combustion or explosion. Cell damage or short circuiting caused by using this type of battery is considered user induced damage and is not covered by any Fenix warranty or liability.
Battery Replacement
Unscrew the light head and insert the battery with the anode side (+) towards the light head, then screw the light head back on.
Charging
1, With the light switched off, open the anti-dust cover to reveal the charging port, then connect the USB Type-C end of the charging cable to the tactical light.
2, The indicator will display red while charging, and will turn to green when fully charged.
3, Once charging is completed, be sure to unplug the charging cable and close the anti-dust cover.
Note:
- The light cannot be operated while charging.
- Recharge the battery promptly to ensure its normal life.
- The normal charging time of the tactical light is approximately 2 hours from depleted to fully charged.
- Recharge a stored light every four months to maintain the optimum performance of the battery.
Battery level indication
Turn the toggle switch to OFF state, then push the tail switches up or down. The indicator will display the current battery level for 3 seconds.
- Green light on: 100% - 85%
- Green light flashes: 85% - 50%
- Red light on: 50% - 25%
- Red light flashes: 25% - 1%
Intelligent Overheat Protection
The light will accumulate a lot of heat when used at high output levels for extended periods. When the light reaches a temperature of 60°C/140°F or above, the light will automatically step down a few lumens to reduce the temperature. When the temperature drops below 55°C/131°F, the light automatically recalls the previously used output level.
Low-voltage Warning
When the voltage level drops below the preset level, the light is programmed to downshift to a lower brightness level until to 50 lumens. When this happens in 50 lumens, the battery level indicator blinks to remind you to recharge or replace the battery.
Usage and Maintenance
- Disassembling the sealed parts can cause damage to the light and will void the warranty.
- Fenix recommends using an excellent quality battery.
- If the light will not be used for an extended period, remove the battery, or the light could be damaged by electrolyte leakage or battery explosion.
- Since gun maintenance requires the use of organic solvents, organic solvents contaminating key components of the light or laser module may cause malfunctions, and the light will not receive normal warranty service.
- Remove the battery to prevent accidental activation.
- Long-term use can result in O-ring wear. To maintain a proper water seal, replace the ring with an approved spare.
- Periodic cleaning of the battery contacts improves the light's performance as dirty contacts may cause the light to flicker, shine intermittently or even fail to illuminate for the following reasons:
A: Poor battery level.
Solution: Replace or recharge the battery (Ensure the battery is inserted according to the manufacturer's specifications).
B: The threads, PCB board contact or other contacts are dirty.
Solution: Clean the contact points with a cotton swab soaked in rubbing alcohol.
Specifications
Reviews
Delivery & Pick-up

Delivery Estimates
The estimated time to ship for each product we sell is detailed on the individual product page just underneath the price. From when your items ship, products typically arrive within 1-2 working days for North Island deliveries and 2-3 working days for South Island deliveries. Rural deliveries may take an extra working day. Bulk & hazard deliveries may take an extra 2-7 working days and tracking links for these deliveries can take a few days to generate.
Next Day Delivery
Need your order in a hurry? PB Tech offers next day delivery for local Auckland addresses. Simple place your order before 4pm (provided your items are in stock) and select our next day delivery option in the checkout. T&C's apply. Learn more about Next Day Delivery.
Same Day Delivery
Need your order in a hurry? PB Tech offers same day delivery for Auckland, Hamilton, Wellington and Christchurch. Simple place your order before 1pm (provided your items are in stock) and select one of our same day delivery options 'Evening Delivery' or 'Urgent 3-hour Delivery' in the checkout. T&C's apply. Learn more about Same Day Delivery.
Shipping Costs
Shipping costs vary based on your location and the items being shipped and in some cases shipping may even be FREE.
To calculate what the shipping costs will be for your order, add the items you are interested in to your cart, view the Shopping Cart page, and select your 'Delivery Area' to calculate the shipping cost.
Shipping Security & Insurance
All orders shipped by PB Tech are sent via a courier with a signature required for each delivery. In some cases, and only where you have given the courier company permission to leave orders at a designated location, your order may be delivered without requiring a signature. All orders sent by PB Tech are fully insured in the unlikely event that your item(s) are damaged or go missing in transit.
1 Hour Store Pick-up / Click & Collect
You can pick-up your online order from any of our stores nationwide. You can select which store you want to pick up from at the checkout. Provided the store you select has stock and there's no hold-ups with payment we will have your order ready within 1 hour (during normal trading hours for that store) otherwise it may take up to 5 working days to transfer the stock to the store so your order can be fulfilled. Learn more about our Click & Collect process.
Overseas Shipments
PB Tech regularly ships overseas to Australia and beyond. If you are located in Australia, you can order directly from our Australian site www.pbtech.com/au. If you are from another country you can order from www.pbtech.com
Returns & Warranty
Popular Flashlights & Portable Lights

 Fenix Camping & Hiking HM65R-T V2.0 Black Rechargeable LED...

 Sansai GL-H484 Aluminium Torch 300LM Ultra Bright, Adjustable...

 Fenix Work & Outdoor HM50R V2.0 Rechargeable LED Headlamp Max 700...

 Sansai GL-H482B Tactical Grade LED Torch water resistant Ultra...

 Sansai GL-H483C Rechargeable LED Torch Ultra Bright 5W LED 800lm...


Fenix Gun Light & Tactical with Laser GL23R Multi-Purpose Tactical Max 1,200 Lumens, Max 240m Beam Distance, Powered by 1 x 18350 1,100mAh Li-ion Battery Included, Build-in USB Type-C Charging Port, Precise Green Laser Sight.. 5 Years Free
- Brand: Fenix
- MPN: FNX-GL23R
- Part #: TOLFNX0147
Product URL: https://www.pbtech.co.nz/product/TOLFNX0147/Fenix-Gun-Light--Tactical-with-Laser-GL23R-Multi-P
| Branch | New Stock | On Display |
|---|---|---|
| Auckland - Albany | - | |
| Auckland - Glenfield | - | |
| Auckland - Queen Street | - | |
| Auckland - Auckland Uni | - | |
| Auckland - Westgate | - | |
| Auckland - Penrose | - | |
| Auckland - Henderson (Express) | - | |
| Auckland - St Lukes | - | |
| Auckland - Manukau | - | |
| Hamilton | - | |
| Tauranga | - | |
| New Plymouth | - | |
| Palmerston North | - | |
| Petone | - | |
| Wellington | - | |
| Auckland - Head Office | - | |
| Auckland - East Tamaki Warehouse | - | |
| Christchurch - Hornby | - | |
| Christchurch - Christchurch Central | - | |
| Dunedin | - |
Features
Fenix GL23R Weapon Light Video
SPECIAL ORDER ONLY!
Important Warnings
FAILURE TO READ AND FOLLOW THESE OPERATING INSTRUCTIONS AND WARNINGS WHEN HANDLING A FIREARM OR THE GL22R CAN BE DANGEROUS AND CAN RESULT IN SERIOUS INJURY, DAMAGE TO PROPERTY, OR DEATH.
Before attaching, inspecting or servicing a firearm-mounted GL23R
- Engage the safety of the firearm if applicable.
- Remove the magazine from the firearm if applicable.
- Open the action and inspect the chamber to be sure it is empty.
Warning
- The LED light with green laser is a high-intensity lighting device capable of causing eye damage to the user or others. Avoid shining the light directly into anyone's eyes.
- This light will accumulate a significant amount of heat while operating, resulting in a high temperature of the light shell. Pay close attention to avoid burns.
- Do not shine an object at close range, to avoid burning the object or causing danger due to high temperature.
Warranty: 5-Years Free Repair Warranty (Battery for 1 year)!
The Fenix GL23R is engineered to fit virtually any rail-equipped pistol. Its recoil-proof LED and TIR lens focus 1,200 lumens of light into a smooth, far-reaching hybrid beam with a large central spot and plenty of spill light, an extremely effective combination for close- to medium-range engagements. Available in high-vis green (520 nanometers), its 5-milliwatt laser is highly visible to the human eye to help the user get on target quickly and accurately. With a Mil-Spec hard-anodized aluminum body that's light, strong and weatherproof, it can handle hard knocks and stay in the fight. Powered by a single high capacity 18350 rechargeable li-ion battery, the GL23R delivers efficient run times in both white light and laser. Intuitive, ambidextrous switching provides instant one-finger control of momentary-on or constant-on activation to help you control the situation. It's a game changer in low-light conflict.
Size: 3.43'' x 1.18'' x 1.69''/87 x 30 x 43 mm
Weight: 4.23 oz/120 g (including battery)
Battery: Included a Fenix ARB-L18-1100 rechargeable battery
PRODUCT FEATURES:
- 1200 lumens maximum output, 240 meters maximum beam distance.
- Uses a Luminus SFT40 LED with a lifespan of 50,000 hours.
- Digitally regulated circuit for maintaining a stable output.
- Reverse polarity protection, to protect from improper battery insertion.
- Design for guns with tactical rails.
- Ambidextrous switching with dual tactical tail switch.
- Dual tail switch can be replaced according to user's preferences.
- Precise green laser sight.
- Made of durable A6061-T6 aluminum alloy material.
- Premium type HAIII hard-anodized anti-abrasive finish.
- Toughened ultra-clear glass lens with an anti-reflective coating.
Operating Instruction:
Mounting
Please make sure your firearm rail is Picatinny rail or Glock rail and choose the appropriate rail plate (Glock rail plate is installed by default), you can change the rail plate to make the tactical light more suitable for your firearm.
1, The GL23R is designed for precise aiming, it required a basic tool or simply a coin to be attached or detached from the side of the weapon or accessory rail.
2, Loosen the rail clamp bolt.
3, Placing the fixed portion of the rail clamp against the accessory rail and align the rail key with the appropriate cross groove in the accessory rail.
4, Tighten the rail clamp bolt and make sure it is securely attached to the firearm. Again a coin should be helpful to obtain sufficient tightness.
Operating Instructions
The tail switches can be operated with both hands. Rotate the toggle switch at the bottom to select the designated mode.
On/off
Rotate the bottom toggle switch from OFF to any mode and push the tail switches up or down to turn on the tactical light. Reset the tail switches to turn off the tactical light.
Output Selection
With the tail switches pressed down, rotate the bottom toggle switch to cycle through OFF?White Light?White Light + Green Laser?Green Laser.
Laser Sight Zeroing
The windage adjustment is at the left sign of the light. Use the included Allen wrench clockwise or counter-clockwise to move the laser point.
The elevation adjustment is located at the bottom of the light, use the included Allen wrench clockwise or counter-clockwise to move the laser point.
When making large adjustments they may be an interaction that causes the laser to move diagonally or bind. It may become necessary to rotate the opposing adjustment screw counterclockwise to allow the laser cartridge to move to the desired position.
*Laser parameters: CLASS 3R laser product, laser wavelength 510 - 530nm, laser optical power output =5mW.
Tail Switches Replacement
Three groups of spare switches are included:
- Use the included Allen wrench to remove the T4 screw on the tail switch, then replace the tail switch and screw the T4 screw back on.
- Users can choose to install two switches of different lengths based on their usage habits.
Battery Specifications
Warning:
*18350 Li-ion batteries are powerful cells designed for commercial applications and must be treated with caution and handled with care. Only using quality batteries with circuit protection will reduce the potential for combustion or explosion. Cell damage or short circuiting caused by using this type of battery is considered user induced damage and is not covered by any Fenix warranty or liability.
Battery Replacement
Unscrew the light head and insert the battery with the anode side (+) towards the light head, then screw the light head back on.
Charging
1, With the light switched off, open the anti-dust cover to reveal the charging port, then connect the USB Type-C end of the charging cable to the tactical light.
2, The indicator will display red while charging, and will turn to green when fully charged.
3, Once charging is completed, be sure to unplug the charging cable and close the anti-dust cover.
Note:
- The light cannot be operated while charging.
- Recharge the battery promptly to ensure its normal life.
- The normal charging time of the tactical light is approximately 2 hours from depleted to fully charged.
- Recharge a stored light every four months to maintain the optimum performance of the battery.
Battery level indication
Turn the toggle switch to OFF state, then push the tail switches up or down. The indicator will display the current battery level for 3 seconds.
- Green light on: 100% - 85%
- Green light flashes: 85% - 50%
- Red light on: 50% - 25%
- Red light flashes: 25% - 1%
Intelligent Overheat Protection
The light will accumulate a lot of heat when used at high output levels for extended periods. When the light reaches a temperature of 60°C/140°F or above, the light will automatically step down a few lumens to reduce the temperature. When the temperature drops below 55°C/131°F, the light automatically recalls the previously used output level.
Low-voltage Warning
When the voltage level drops below the preset level, the light is programmed to downshift to a lower brightness level until to 50 lumens. When this happens in 50 lumens, the battery level indicator blinks to remind you to recharge or replace the battery.
Usage and Maintenance
- Disassembling the sealed parts can cause damage to the light and will void the warranty.
- Fenix recommends using an excellent quality battery.
- If the light will not be used for an extended period, remove the battery, or the light could be damaged by electrolyte leakage or battery explosion.
- Since gun maintenance requires the use of organic solvents, organic solvents contaminating key components of the light or laser module may cause malfunctions, and the light will not receive normal warranty service.
- Remove the battery to prevent accidental activation.
- Long-term use can result in O-ring wear. To maintain a proper water seal, replace the ring with an approved spare.
- Periodic cleaning of the battery contacts improves the light's performance as dirty contacts may cause the light to flicker, shine intermittently or even fail to illuminate for the following reasons:
A: Poor battery level.
Solution: Replace or recharge the battery (Ensure the battery is inserted according to the manufacturer's specifications).
B: The threads, PCB board contact or other contacts are dirty.
Solution: Clean the contact points with a cotton swab soaked in rubbing alcohol.


